Trelleborg Flange Gasket Installation Instructions
Download our print friendly PDF here
Inspection
- Remove old gasket and all residue from surface of flange carefully
- Inspect flange surface and new gasket for any defects prior to install
- Verify gasket material is as required for compatibility
- Repair all nicks/gouges ( >1/32’’ in depth) and replace where needed
- Radial scratches MUST be repaired or replaced due to seal difficulty
Gasket Install
- Align flanges surfaces and bolt holes
- Ensure flanges are parallel to each other
- Insert gasket between the flanges on required sealing surface
- If gasket contains bolt holes, ensure proper alignment
- ID of gasket should never be smaller than ID of flange
- Carefully compress mating flange down onto gasket
- Adhesive is only recommended when absolutely necessary
- Coat minimum amount of gasket required to fix in place
Lubrication and Fasteners
- Confirm lubricant compatible with application parameters
- Recommended lubricant friction coefficient K < 0.17
- Liberally lubricate all bolt threads, washers, and nuts
- Be careful not to contaminate gasket with lubricant
- Hardened washers are recommended
Bolt Tightening
- Prior to tightening, consult torque tables based on application parameters to find target torque
- Never torque bolts under pressure
- If deviating from table parameters, further calculation required (consult Trelleborg engineering team)
- Utilize calibrated torque wrench during install
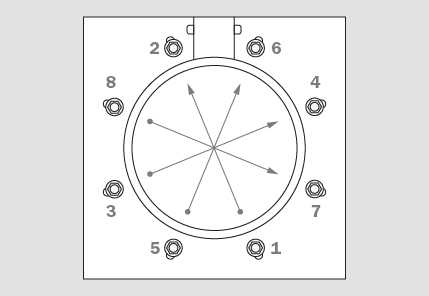
- Follow torque sequence and torque in star pattern as indicated below
- Final pass should be in clockwise fashion
- Depending on material, retorque bolts 24 hours after install
TORQUE SEQUENCE
| 1st Pass | Finger Tight |
| 2nd Pass | 30% |
| 3rd Pass | 60% |
| 4th Pass | 100% |
| 5 Pass | 100% |